You should probably be using Cinemachine
Something I noticed quite a bit when looking at people doing virtual productions in VRChat is the lack of use of Cinemachine. Or even if Cinemachine is used - it is constrained to a simple rail track that has to be either manually controlled or is doing a single loop.
So today we're going to look into spicing up your Cinemachine setup with minimal to no scripting whatsoever!
Prior Knowledge
This tutorial assumes you know your way around the unity editor (creating game objects, animations, adding components) and the basics of Udon Graph (able to replicate a simple graph from a screenshot), U# or some other way of making scripts.
What are we going to build
At the end of this tutorial, you will have a multi-room camera system, which rotates through different shots based on where the player is currently, and switches to a "Hero" player tracking camera when they get up on a stage. All of that with just 2 tiny scripts.
So let's get into it!
State-Driven Cameras
If you're going to take away a single thing from this article, then let it be this: please use state-driven cameras
The state-driven camera is the most zero-code solution capable of covering most, if not all, of your camera-related tasks. Let's walk through a simple event setup to see why.
The Basics
In short, a state-driven Cinemachine camera is a setup where the current state of the animator defines which virtual camera is going to be used. In its simplest form, it can allow you to rotate between a couple of pre-configured shots without writing any code manually. So let's do that!
What are virtual cameras
Cinemachine operates with 2 core concepts: The Virtual Cameras and the Cinemachine Brain. If you never used Cinemachine before - here's the gist of it.
When using Cinemachine - you will create many virtual cameras. You can think of them as different shots. Each virtual camera represents a set of settings: what is the FoV, will the camera move and how, will the camera look at a particular object, should it follow the object, etc. Virtual Cameras do not contain actual camera components, hence the "virtual" part. Their only responsibility is to capture a particular camera shot set up for you to utilize in some way.
Cinemachine Brain, on the other hand, goes onto the object with the actual Unity camera. It checks for all the virtual cameras present on the layers that the camera can see and then switches between the virtual camera shots based on a variety of rules. By default, if you simply have a bunch of Virtual Cameras and one Cinemachine Brain - it will always follow the Virtual Camera with the highest priority. You can also set the camera to "solo" which will force the Cinemachine Brain to switch to that particular shot.
The process of juggling which Virtual Camera should take priority at this moment is part of Cinemachine a lot of people can find daunting, and this article aims at teaching you State-Driven cameras which make this whole thing a non-issue by offloading all the logic into UI and Animators.
Create a new scene, and add a plane and a couple of objects, so we can see what is going on.

Now Let's create a new State Driven Camera. Right-click in your hierarchy -> Cinemachine -> State-Driven Camera.

We don't want it to be controlling our Main Camera, so lets remove the Cinemachine Brain Component from it.
Then make a new Camera and add a Cinemachine Brain component to it.

Don't forget to remove the extra Audio Listener from this new camera! Or Unity will spam your logs with warnings.
Give your newly-created camera and the State-Driven Cinemachine camera some descriptive names so we can stay organized.

Because State-Driven cameras are controlled via Animator States (hence the name), we now need to create an animator to control our cameras.
Let's start with the basics:
- Create a new Game Object and call it Multi-Shot Controller
- Create a new Animator Controller in your Assets, we can call it Multi-Shot Animator
- Create a new Animation Clip in your Assets, call it Shot 1
- In the animator window - drag & drop the Shot 1 state into your animator
- Drag & Drop your newly created controller onto the Game Object you just created

Now we should tell our Cinemachine to use that controller. Simply Drag & Drop the Multi-Shot Controller into the Animated Target field of the Multi-Shot CM inspector

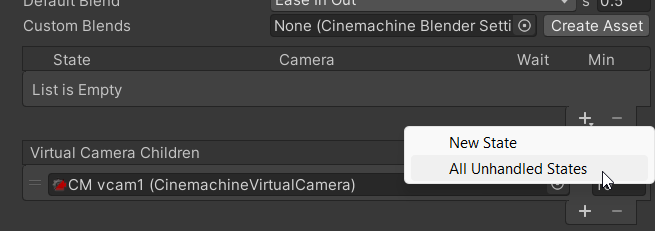
Now we can set up our first shot! Click the little "+" button in the states list and select "All Unhandled States". That will simply load up our single Shot 1 into the list of states for Cinemachine to handle.
Now we can set our Shot 1 to use CM vcam1
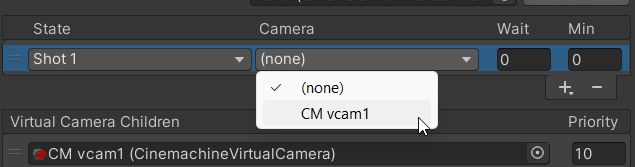
This tells Cinemachine to use the CM vcam1 virtual camera whenever the Shot 1 state is active in the animator. You can most likely see where this is all going now.
Now position your scene view somewhere where you can see the whole scene, select the CM vcam1 Game Object, and click Game Object -> Align With View in the top menu (or use the Ctrl+Shift+F shortcut). You should also set Body and Aim to "Do Nothing" in the CM vcam1 inspector.

If you enter playmode now, you should simply see our Multi-Shot Camera looking at the scene from the view of CM vcam1, how exciting! Ok, maybe not that exciting, but we now have all the pieces we need to make it much more interesting.

Let's add a couple more shots now.
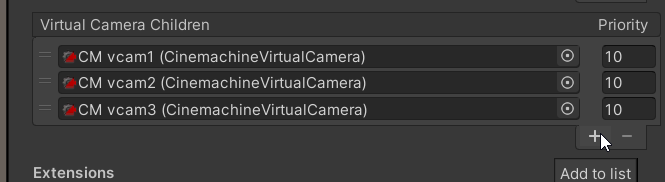
In the Multi-Shot CM inspector - add a couple more cameras using the "+" button in the bottom list.
Then position those cameras in different corners of the scene. Don't forget to set Body and Aim to "Do Nothing" on those so Cinemachine is happy with us.
Now make a couple of new Animation Clips in your assets: Shot 2 and Shot 3, you can simply duplicate Shot 1 and it will increment the number.
Then drag those new shots into the Multi-Shot Animator and connect them with transitions like so:
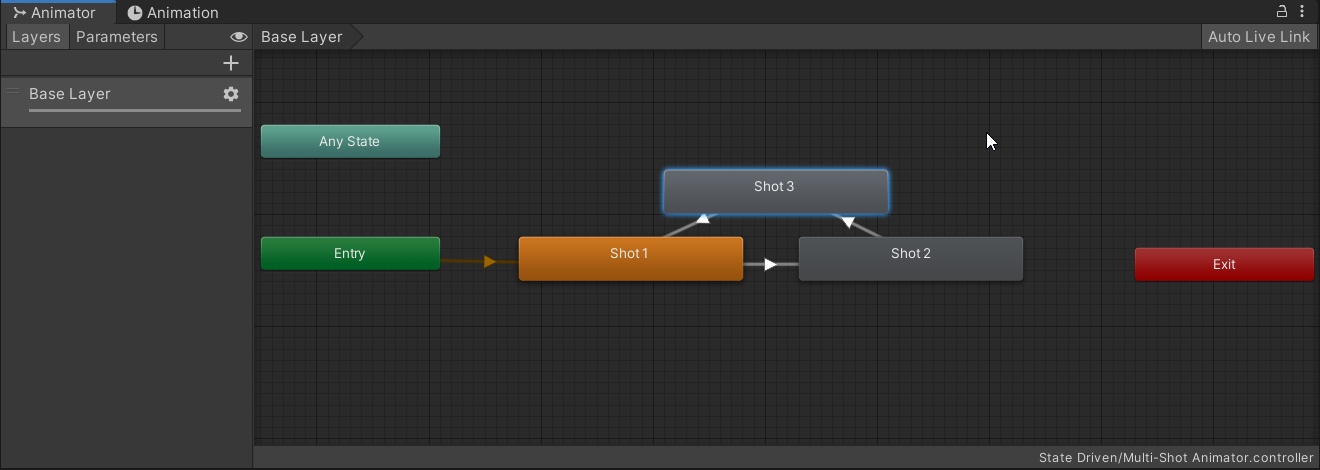
This will create a looping shot rotation. Now you can add those unhandled states into the Multi-Shot CM by clicking the "+" in the state list and choosing All Unhandled States once more.
Then assign vcam2 and 3 to Shot 2 and 3 respectively.

If you enter the playmode now and select Multi-Shot Camera - you should see it switch between shots in the little camera preview! No code is required!
Controlling Transitions
Right now our camera is simply sliding between positions. But what if we want to cut between them instead? We can certainly do that!
There are 2 ways to do this. If you just want to cut between them - you can set the Default Blend to "Cut" on the Multi-Shot CM and call it a day. Or use one of the other included options.

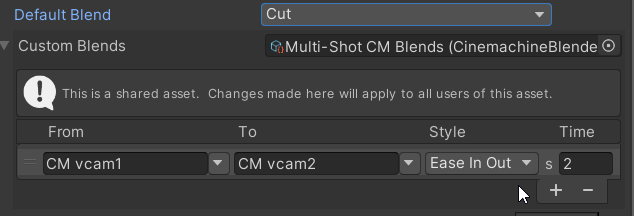
But what if you only want to cut between some of them and blend between others? Well, that's where Custom Blends come in. Click the Create Asset button and save it somewhere in your assets folder.
Then expand the "Custom Blends" foldout that appeared, click the "+" and select CM vcam1 and CM vcam2. If you leave the blend mode to default here, you will now have a setup where the camera cuts between shots 2-3 and 3-1, but blends between 1-2.
Enter playmode to give it a go!
You can now add as many virtual camera shots as you need and configure the transitions to be a bit less jarring by setting Exit time to the time in seconds you want it to wait before switching. But that's all you need to know if you just want to animate between different shots!
Make it dynamic
While switching between static shots is fine and all, we're here making video games! Or VRChat worlds at least. And while switching between shots automatically is really useful, what if we also want to sometimes switch to, lets say, a hero shot that is focused on a player? Or maybe toggle between groups of shots based on which room the player is in? Well good news, State-Driven cameras make it super easy as well!
This will involve a tiny amount of scripting (both graph and C# examples will be provided). But ultimately all we need is to set some Animator Parameters in reaction to players, so if you already have your ways to do that - you already have that handled!
Multiple Rooms
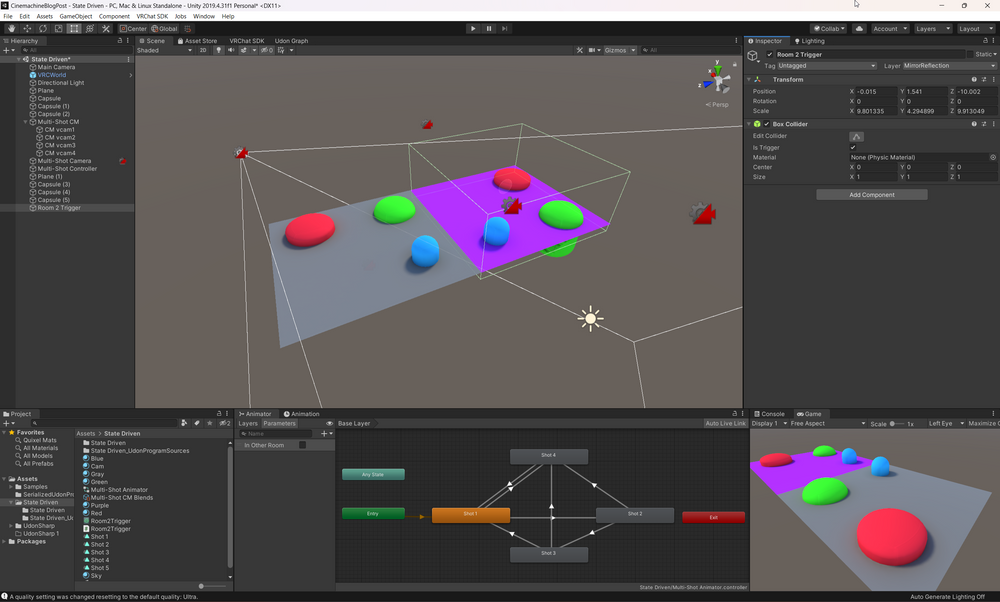
Let's imagine that our camera is a security camera and it wants to be tracking the player from multiple directions and switch around depending on which room the player is in. We already have one "room" set up, so let's add another one right next to it.

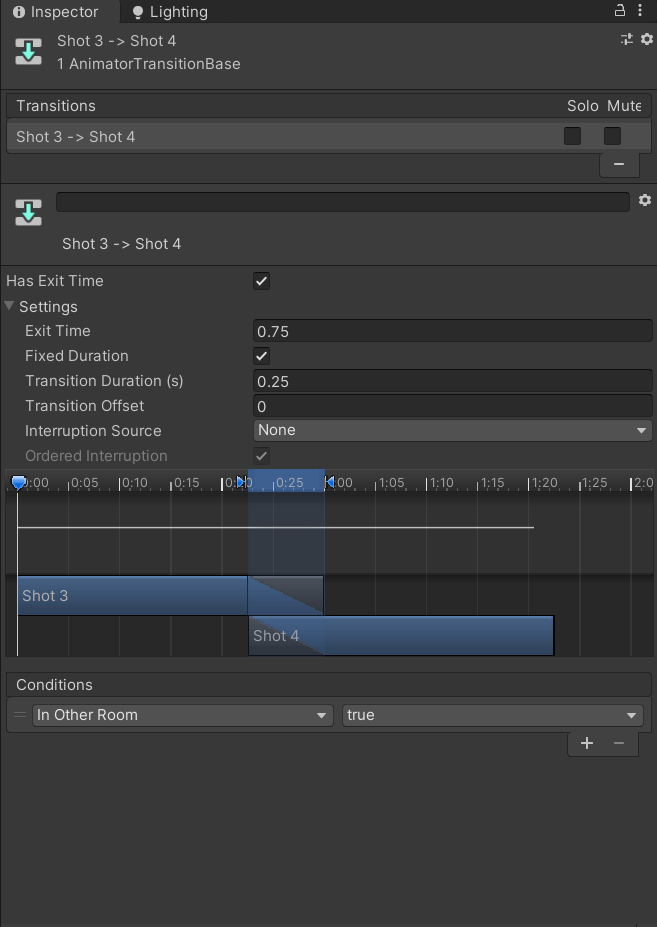
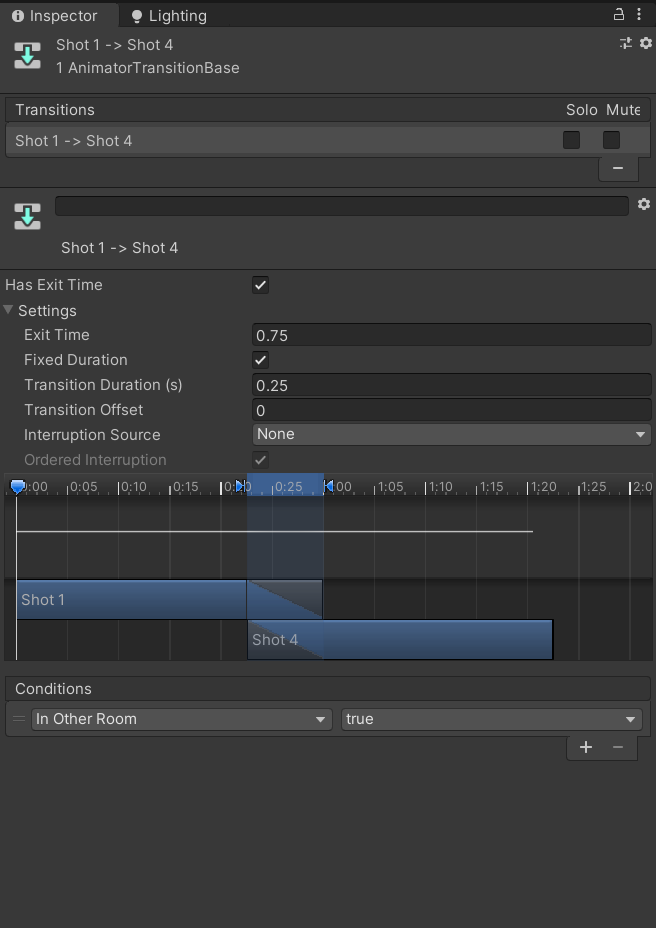
Now let's add a camera and a new shot in this new room. If you followed along - you already know how to do all that. Here's the final setup we're looking for:
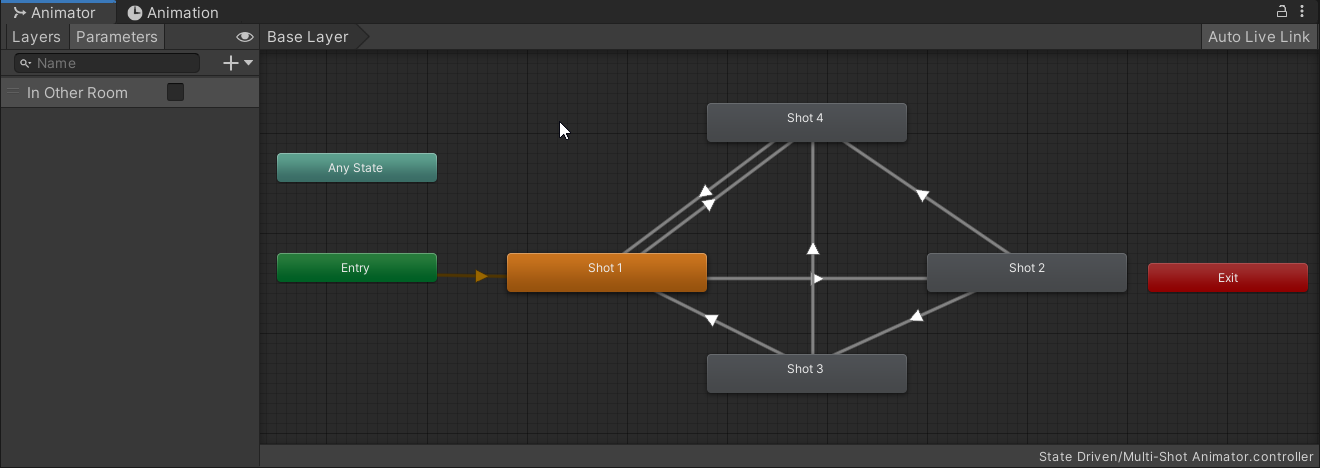
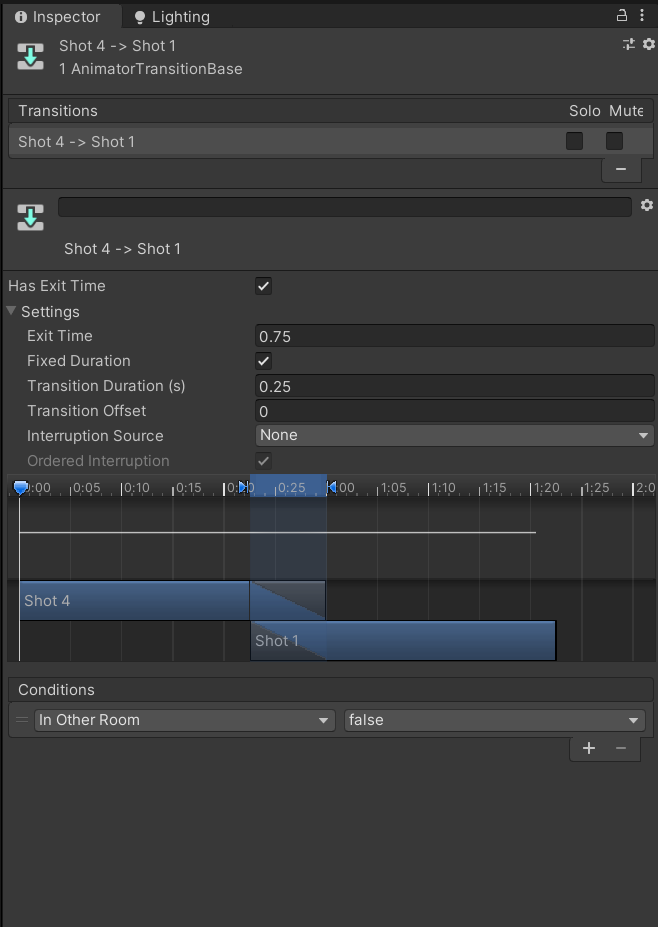
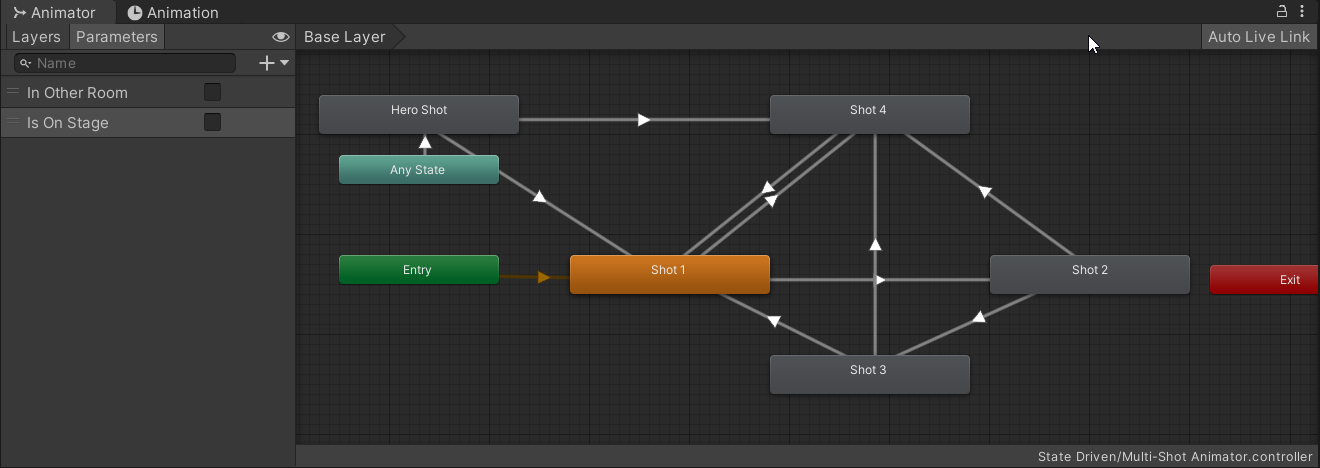
As you can see I also added some transitions from the Shots 1,2,3 to Shot 4 and back from Shot 4 to Shot 1. All of the transitions going to 4 have a condition of "In Other Room == True" and from 4 to 1 "In Other Room == False".

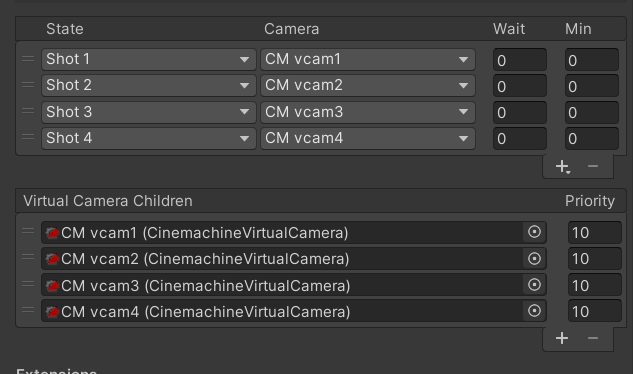
You should add the new state to the state list of Multi-Shot CM and assign the newly added vcam4 to it.
Now we just need to adjust the "In Other Room" parameter when we enter and exit our purple room.
Add a new Cube to your Scene and position it so it covers the purple room area. Then delete the Mesh Renderer and Mesh Filter components. Set the layer to MirrorReflection and mark the Box Collider as a Trigger. Let's call it "Room 2 Trigger"
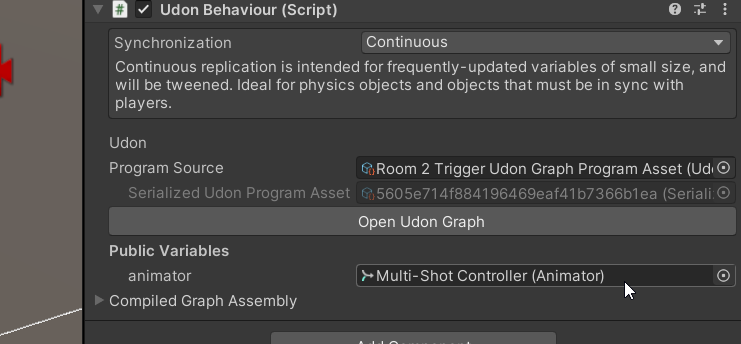
Now we can add a new Udon Behaviour to it with the following Graph:

All we're doing here is setting the "In Other Room" animator parameter to "True" when the localPlayer enters the Trigger collider. and to "False" when they exit.
C# Code for such functionality would look like this:
using UdonSharp;
using UnityEngine;
using VRC.SDKBase;

public class Room2Trigger : UdonSharpBehaviour
{
    public Animator animator;

    public override void OnPlayerTriggerEnter(VRCPlayerApi player)
    {
        if (!player.isLocal) return;
        animator.SetBool("In Other Room", true);
    }

    public override void OnPlayerTriggerExit(VRCPlayerApi player)
    {
        if (!player.isLocal) return;
        animator.SetBool("In Other Room", false);
    }
}
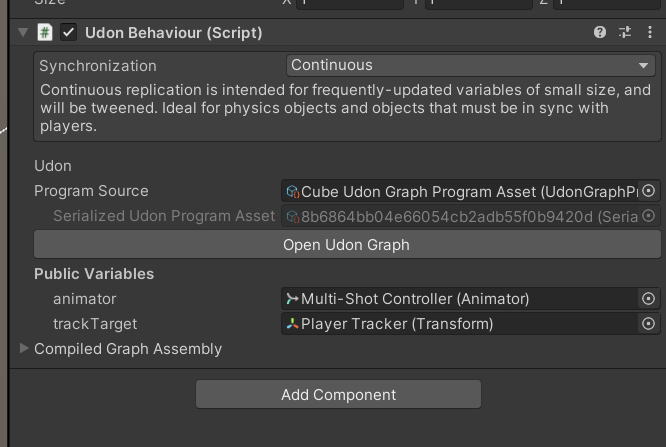
Don't forget to set your animator reference to "Multi-Shot Controller" in the inspector!
If you set up everything correctly, you should be now able to enter playmode and go into the purple room. When that happens - the camera should switch to vcam4. When you go back - it should switch back to 1,2, and 3.
And voila, we have our multi-room setup, where the cameras switch based on which room you're in.
Refining the cuts
While our cuts work, they are definitely a bit too harsh. You might have also noticed that if you dip in and out of the room quickly - it hard-cuts immediately, which might be undesirable.
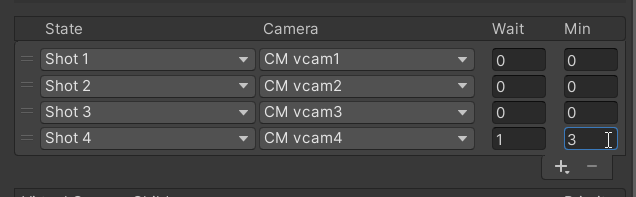
Let's utilize the "Wait" and "Min" settings on the states list to adjust that!
- "Wait" controls the amount of time the state must be active before Cinemachine will switch to it
- "Min" controls the amount of time the camera will be active to avoid cutting too early
We can set the "wait" on our Shot 4 state to 1 second to make it so our player must be in the purple room for at least 1 second for it to switch. And then "min" to 3 seconds, to make it so our state is always active for at least 3 seconds after the switch.
Let's also adjust our blends, so that our camera smoothly switches to and from vcam 4 and then cuts between the rest.
Cinemachine's custom blends make that super easy! If you enter playmode now, you should get something like this
With all of the above combined, you should be able to tackle almost any kind of conditional camera setup without using much code. The sky is the limit at this point.
💡
Remember that you are not limited to static virtual cams either. You can still use the full suite of Cinemachine tools available: body transposers, aim-at setups, and dolly tracks!
Bonus Chapter
Let's finish this off with a bang! Or rather, a stage, I suppose. Let's say you have an event location and you want to automatically switch to track the player on the stage with a zoomed-in follower camera whenever someone gets up there.
We will extend our current setup with another room that we'll treat as our improvised stage. Here's how it will work
- You will need a new Shot animation state, let's call it a Hero Shot, which is accessed only when the "Is On Stage" parameter is true
- We will create a new vcam and connect it to that new Hero Shot state as usual
- We will make a new empty object that tracks the position of any player who entered the stage last
- We will make the camera aim at the player and move around whenever the player is about to escape the camera's field of view
Here's the animator setup we're looking for, I'm not going to screenshot everything at this point, as we went through this multiple times already.
And here's the Cinemachine setup

Now let's take care of player tracking. First, let's make a stage area since we need someplace to go first.

Now add a new Box trigger around the stage same way we did for the purple room
And then add a following script to it
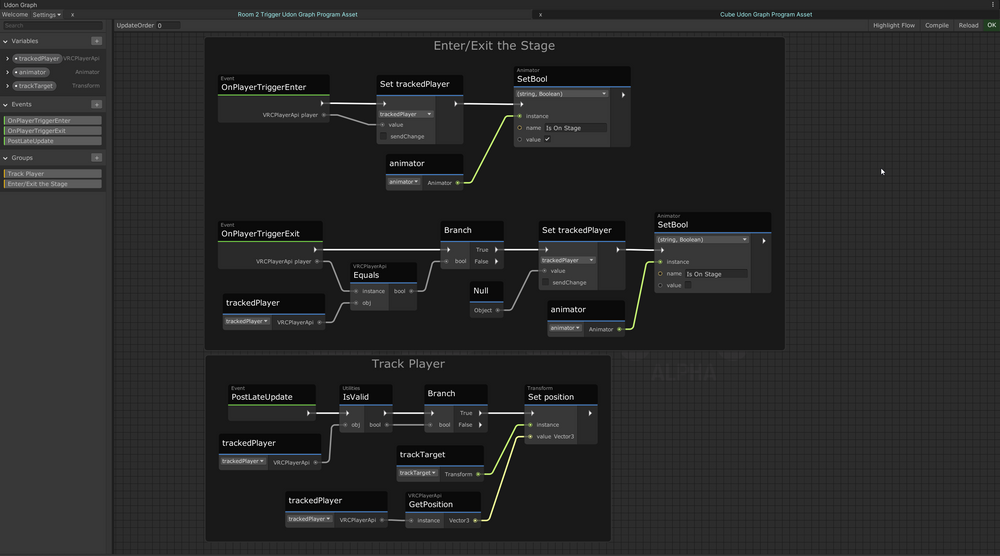
Here's a C# Equivalent
sing UdonSharp;
using UnityEngine;
using VRC.SDKBase;

public class StageTrigger : UdonSharpBehaviour
{
    public Animator animator;
    public Transform trackTarget;
    private VRCPlayerApi trackedPlayer;

    public override void OnPlayerTriggerEnter(VRCPlayerApi player)
    {
        trackedPlayer = player;
        animator.SetBool("Is On Stage", true);
    }

    public override void OnPlayerTriggerExit(VRCPlayerApi player)
    {
    	if (!player.Equals(trackedPlayer)) return;
        trackedPlayer = null;
        animator.SetBool("Is On Stage", false);
    }

    public override void PostLateUpdate()
    {
        if (!VRC.SDKBase.Utilities.IsValid(trackedPlayer)) return;
        trackTarget.position = trackedPlayer.GetPosition();
    }
}
This script is an extension of our previous script with a couple of additions:
- We save the reference to the player who entered the stage last into
trackedPlayer - We clear the reference to the tracked player if they exit the stage
- If we have a
trackedPlayersaved - we move thetrackTargetto the position of the player
That is all the scripting we have to do. Now we need to create an empty Player Tracker object, and assign it to the trackTarget variable, and our "Multi Shot Controller" to the animator variable.
One thing we should do before wiring up our final vcam5 to point at the player on stage is to make a new empty inside the "Player Tracker" that is offset from the ground at around 1.2-1.4 units, that will make it so the camera points somewhere around the neck of an average VRChat avatar, instead of looking at their feet.

Now we can select our vcam5, position it in front of the stage, and tell it to track the Camera Aim Target transform by dragging it into the "Look At" field, and setting the Aim to "Composer" mode.
You can use the "Solo" button on the vcam5 to easily adjust the limits of the camera tracking. The limits will be shown in the Game view

And now you should have everything ready to try it all out!
Phew! That was a lot, but I hope this tutorial showed you how powerful State-Driven cameras can be, especially considering how little code it needs to control. Most of the things we did are handled directly by the Cinemachine inspector without any involvement from Udon.
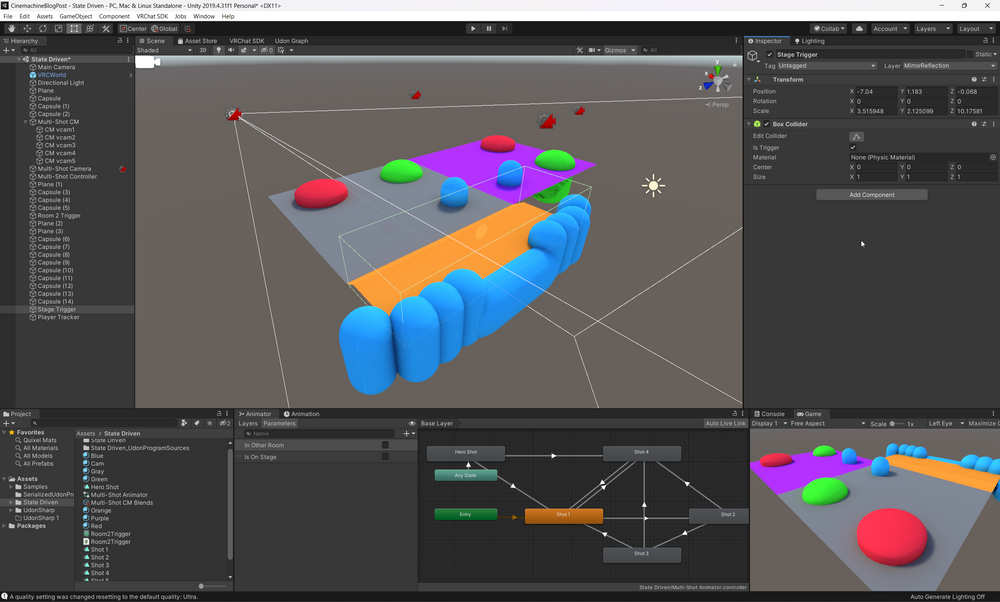
And here's the final scene all packed-up
Some Final Thoughts
Doing camerawork in Unity, and especially in VRChat can seem like a very daunting task, and sometimes it definitely is!
But I hope this tutorial has shown that you need very little to get yourself 80% there. So if you're someone doing virtual production in VRChat right now, no matter the scale, from a small group of friends playing D&D to virtual talent shows, you should definitely look into State Driven Cameras. They will make your life much easier, and with less than an hour of work, you can get yourself 80% percent there.
Hope this will be useful for you! And if it was - feel free to ping me @orels1_ on twitter with your setups. I would love to see them!
Further Reading
Some useful links for you to check out
Continue Reading
2023 Year in Review
It's time to rewind to the beginning of the year to look at the things I've made and shared, as well as a couple of projects that I haven't talked abo...
Unity Scripted Importers: Texture Generator
In this article we'll look into what they are and how you can use them to create a procedural Texture Generator...
Why do you need a Shader Generator and how ModularShaderSystem is here to help
Developing complex Unity Shaders is hard. Can you make your life easier? Maybe! Let's look into the issues of vanilla shader development and how can w...